Archive | Minus Nuts RSS feed for this section

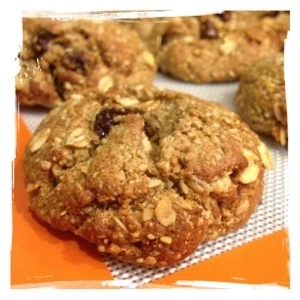
Meal Replacement Oatmeal Raisin Cookies

6 Mar

These cookies are to die for! They are big, filling and healthy! Wait, did I just say healthy? You bet I did! There is absolutely no junk in these cookies and they are so substantial that they could serve as a meal replacement alongside a green smoothie. Protein bars, be gone: this is a protein cookie!

20130306-214823.jpg

I have no apprehensions about giving these to my family to eat for breakfast or a supper on the road. They also make a nice, filling snack for school lunches, the gym, and hiking. I often keep one in my purse when I go to Costco so that I am not tempted to fill up on junky samples. Who needs them? These cookie are way better. Sometimes you just need something quick and portable. These cookies fit the bill! If you wrap them individually and store them in an airtight container they will keep for two weeks. They also freeze wonderfully for up to three months.

To satisfy the chocolate tooth in our house, I usually mix half chocolate chips and half raisins. To make these vegan, opt for maple syrup instead of honey. I have tried it and it works perfectly. This recipe is completely gluten free!

Ingredients
Makes 15 cookies

1 3/4 cup raw shelled pumpkin seeds
1 3/4 cups gluten free rolled oats (3/4 cup reserved)
1/2 cup quinoa flour
1/4 cup coconut flour
1/2 cup date sugar
1 tsp baking soda
1/2 tsp cinnamon
1/2 cup honey
2 tbsp coconut milk
3.5 tbsp coconut oil
2 tsp vanilla
2/3 cup raisins

Directions

1. Preheat oven to 350 F. Place the pumpkin seeds in a food processor and pulse just until they are finely ground.

2. In a large bowl, mix the flours, baking soda, cinnamon, 1 cup oats, and date sugar. Add these ingredients to the food processor and process for about 20 seconds to incorporate.

3. In a pot on the stove, melt the coconut oil. Add the honey, coconut milk, and vanilla. Once it blends together easily, pour into the food processor and process until it is fully combined. The dough will be quite sticky. Remove the dough from the processor and put it back in the large bowl.

4. Knead in the 3/4 cup of reserved oats and raisins with your hands.

5. Take 4 tbsp of dough at a time and form it into a cookie with your hands. Place on a parchment lined cookie sheet and repeat. You should get about 15 cookies.

6. Bake precisely 10 minutes. Cool 5 minutes then gently use the tips of your fingers to reshape any cracked cookies while they are still warm and on the cookie sheet. Allow to cook completely before individually wrapping and storing in an airtight container.

Vegan Banana Chocolate Chip Muffins

27 Feb

20130227-084703.jpg

Over the past seven days my life has been crazy! Two major appliances bit the dust and have been replaced and our extra curricular activities are keeping us out of the house. I felt the need to make a quick grab-and-go snack (besides what’s in my over-flowing fruit bowl) and made these muffins. They are fantastic and have the billowy muffin tips you see on store-bought competitors. Not only are they vegan, they are free of refined sugar with the exception of the chocolate chips.

To make them more healthful, I modified the original recipe and used coconut sugar instead of the plain old white stuff. Coconut sugar has a lower glycemic index than sugar and works great in cookies and muffins. It dissolves nicely, but adds weight to your baked goods, similarly to brown sugar. I recently noticed that Costco in Calgary, Alberta Canada is selling coconut sugar, so check yours out too! You can also purchase it in health food and organic-type grocery stores.

Another quick and easy modification I made was using 1 cup of all-purpose flour and 1 cup of whole wheat flour instead of the 2 cups of all-purpose called for. Whole wheat flour adds fibre and I bet one could use oat flour in its place if increasing fibre further is important.

If you wanted to make these muffins completely free of refined sugar, cacao nibs, chopped dried dates, raisins, chopped nuts or seeds, etc. would make smart substitutions. This recipe great as is, but is also versatile enough to suit your needs: enjoy playing with it and let me know your results.

One tip: for maximum banana-y goodness, be sure to use ripe bananas. You know they are ripe enough when the peels are dotted with black spots and the insides are so soft you could mash them with a fork. I like to purée my bananas using an immersion blender, but fork mashing will do in a pinch.

Now get in the kitchen and make yourself some muffins!

Vegan Banana Chocolate Chip Muffins

Yield: 16 standard sized muffins

1 cup all purpose flour
1 cup whole wheat flour
1 1/2 tsp baking soda
1/2 tsp salt
1 cup coconut sugar
1/3 cup coconut oil, melted
4 ripe bananas, puréed
1/4 cup water
1 tsp vanilla extract
1 cup vegan semi sweet chocolate chips

Directions:

Preheat the oven to 350 degrees. Line your muffin tin with paper liners.

In a bowl, mix the flours, baking soda and salt.

In a separate bowl, mix the coconut sugar and the melted coconut oil. Add the mashed banana to the sugar mixture, then add chocolate chips, water and vanilla.

Lastly, add the flour, and mix everything well.

Fill each muffin tin 3/4 full of batter and bake in the oven for 25-30 minutes.

Raw Vegan Brownies with Fudgy Frosting

15 Feb

Have things ever been a changin’ in the Morsels Minus kitchen. In the past year it has seen more changes than you can imagine! I have gone mostly vegan while the rest of my family remains omnivorous. A Vitamix came on the scene in the spring and has helped me incorporate so many more healthy fruits and veggies into our diets. I have also found a passion for raw baked goods.

Not only have things been changing in the kitchen, I have an entirely new kitchen. In the summer we packed up and moved from Saskatchewan to Calgary, Alberta. While I miss my friends in Meadow Lake, I must say that I am loving the city. Fresh, exciting new ingredients make regular appearances in my pantry and refrigerator and I am enjoying the abundant options I have for grocery shopping. Within a few blocks of my house I have access to your standard grocers as well as a couple of fantastic organic markets.

The bottom line is that I have a ton of new recipes on deck to share with you and I am back. What you can expect from Morsels Minus is a lot of healthy recipes with quality ingredients. You are going to love our new ways!

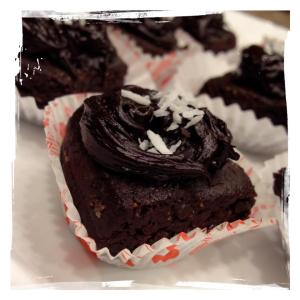
Here’s one of my favourite new recipes. It’s for Raw Vegan Brownies. I love so much about them. They are loaded with healthy seeds, quick to make, and absolutely delicious. If you make them once, you will never stop. They keep in the fridge for up to one week, but I’ll bet they won’t last that long! My kids, husband and I all go nuts over these. They make a great treat, but I sometimes eat them for breakfast! They are full of omega 3 fatty acids, protein, antioxidants, and fiber, so why not? You’ll feel like you’re indulging, but you are really nourishing your body. If you’re looking for a great gluten free dessert, this is perfect! Some of you may favor using nuts and if you do, I recommend omitting the coconut oil in the brownie dough and using cashews.
253083_10151939791195400_1720565785_n

Raw Vegan Brownies

Yield: 9-12 squares

In a food processor combine:

3/4 cup hemp hearts, raw shelled sunflower seeds, or raw shelled pumpkin seeds

12 pitted Medjool dates

1/4 cup cacao powder (or cocoa powder)

a pinch of sea salt

1 tbsp coconut oil, melted

  1. Process until a smooth, chocolatey, dough ball forms.
  2. Remove from food processor and cut into squares. Place each square into its own mini muffin tin liner.

Fudgy Frosting

Makes 1/4 cup

In a food processor combine:

1/4 cup agave nectar

1/4 cup cacao powder (or cocoa powder)

1 tbsp coconut oil, melted

  1. Refrigerate for 10 minutes until it is soft and pliable. Kind of like Play-Doh!

Put it all together…

  1. Take a little ball of frosting, about 1/2 teaspoon, and use your fingers to spread it over a square. Repeat until each square is frosted.
  2. Optional toppings to decorate your brownies may include shredded coconut or chopped seeds/nuts.
  3. Store in an airtight container in the refrigerator.

Some of you might be curious about the differences between cocoa and cacao. Cacao is a raw superfood. It is loaded with fiber and anti-oxidants. Cocoa is basically cacao’s less nutritionally dense second cousin. So if it’s an option and it’s within your budget, choose cacao!

I hope my readers will forgive me for my long absence from the virtual stage. If you are interested in following my recipes on Instagram, search me out @nothingrhymeswithandrea

Looking forward to getting reacquainted!

Dairy and Gluten-Free Vegan Coconut Yogurt

23 Apr

Oi. I have no excuse for not blogging in so long. Actually I have lots of excuses. Family life, winter activities winding down, spring cleaning, Easter holidays, and my new vegan cupcake business have filled my empty time slots. Rest assured that I have made lots of great new recipes during that time and I am ready to share them with you. Stay tuned for a great hot rice salad, and a HEALTHY (for real) and YUMMY (for real) and VEGAN (of course) brownie recipe.

Now back to this post…

A couple of days ago I made it to the city, and by city, I mean an oversized town with a Nutters. For those of you who haven’t been to a Nutters, it’s a Canadian bulk and natural food store chain. Product selection varies greatly by store, but I found one with this exciting new product I heard about via Jillian Michaels:

So Delicious cocoyo (an affectionate turn for coconut yogurt) is, in fact, delicious. The available flavors were strawberry, vanilla, blueberry, and plain. I opted for the strawberry and my kids really liked it. Because they are allergic to dairy products, they have never tasted yogurt… until now. Sure, you say it’s not made of milk, how much like yogurt is it? Quite a bit actually! Yes, it tastes coconut-y, but the texture is thick and creamy like Greek yogurt. You can tell that a thickener (guar gum) has been added to it as it is “not the same kind of thick” as Greek yogurt. Don’t be fooled into thinking that all dairy products have a natural, inherent thickness. Believe it or not, yogurt’s texture is not a God-given benefit of mammalian sourcing. Greek yogurt is one of the few varieties that doesn’t use gelatin or other ingredients to thicken it. If you eat dairy products, try Greek sometime. It really is a cut above.

Back to cocoyo. It’s expensive. A pint typically costs between $6.00 – $7.00. Ouch. Yeah, it’s good, but I’ll never be able to buy it in the abundance I would like to. I quickly decided that I would try to make my own. I was looking at a vegetarian cooking site with lots of great recipes called Happy Herbivore. On it, there was a recipe for soy yogurt. I followed her recipe with exactness, but found that it wasn’t thick enough for me. I added 1/2 cup of frozen berries and blended. Still not thick enough. I blended in 1/2 tsp of guar gum (also available at Nutters) and the texture was perfect, BUT it still tasted distinctively tofu-y, SO I added a tbsp of real vanilla extract, and…

it was okay. I would give it a 5 out of 10. The kids still ate-it-up. While banana and berries are the most prominent flavours, I could still taste tofu.

SO…

(This is the good part:)

the next time I made homemade vegan yogurt with a 400 mL can of regular coconut milk (not the low-fat stuff). Move  out of the way soygurt, and So Delicious cocoyo, because my homemade cocoyo is a superstar. This stuff rocks! The kids, my carnivorous husband, and I ALL L-O-V-E-D it. If you are familiar with the Yoptimal Immuni+ store brand dairy yogurt, that is what my recipe most closely resembles in appearance and taste. In EVERY way it has the So Delicious cocoyo beat. My cocoyo’s flavour and texture was much better and exactly what you would expect from yogurt. There was no weird, dough-y texture. Yes, there is more fat in it, but using a whole food like coconut milk instead of tofu makes it much healthier. Now I don’t have to waste time hunting for vegan yogurt.

My most important tip with this recipe is to be very careful with guar gum. It has 8 times the thickening power of cornstarch, which make it a magnificent thickener for this recipe, so long as you measure carefully and follow the directions very closely. You may choose to add more or less guar gum than the recipe calls for so that you achieve your favourite thickness. Since I mentioned it, don’t get any ideas about using cornstarch. I can guarantee that it will make your yogurt dough-y.

My second most important tip is to refrigerate the banana. Do not skip this step. This is a recipe that will always be thicker when cold, so to avoid a tragic overuse of guar gum, it must be prepared at the consistency you would eat it at, i.e. COLD.

Here’s my super easy recipe, which makes 1 pint. Why not get the kids involved? Mine had a blast making it!:

Ingredients:

1-400 mL can of full fat coconut milk (I used the Aroy-D brand), refrigerated until firm

1 cold banana, cut into 1 inch slices

1 tbsp vanilla extract

2 tbsp lemon juice

2 tbsp pure maple syrup (optional)

1/2 cup frozen berries, peaches, and/or mangoes

1 tsp guar gum (I used the Bob’s Red Mill brand)

Directions

  1. Put all of the ingredients except for the guar gum in a food processor or blender. Blend until smooth.
  2. Add 1/2 of the specified amount of guar gum. Blend. Check the consistency. If you like it, stop here. If it’s too runny, add the remaining guar gum. Blend. Check the consistency again. If you need, add more gum a pinch at a time, blending after each addition.
  3. Refrigerate and enjoy.
Don’t write off this recipe because it includes guar gum. Just go to the health food store and pick some up; it is well worth your while.

Variations: Substitute the frozen berries for frozen banana to make “plain” yogurt. You could use agave nectar (vegan), sucanat (vegan, sugar cane natural sugar), or honey (not vegan) to sweeten it instead of maple syrup.

Trivia: What exactly is guar gum? It is the endosperm of guar beans, cultivated as a seed crop in India. Guar gum is gluten-free. 

Raw Vegan Chocolate Chip Cookies

10 Feb

Life is complicated enough and when a special holiday rolls around I get roped into so much baking that I crave simplicity more than sweets. I was considering baking sugar cookies for the kids (which we all love) as a pre-Valentine’s treat, but stumbled on this recipe for Raw Chocolate Chip Cookies on Oh She Glows. Yes, I have been pillaging OSG for recipes lately. The thing about my life in the kitchen is that I can never just make a recipe as-is. Allergies require modification of nearly every good thing I find. Sometimes my recipes turn out, sometimes they don’t, and increasingly I am finding big-time winners. The winners make it here on my blog after we are done eating them.

So back to the sugar cookies… Sugar cookies just didn’t seem like the right thing to make right now. We are going to overdose on chocolate and cupcakes over the next few days and I know it, so I wanted to make something that was still a treat without  turning our family into sugar-reliant monsters. Sugar cookies are also a lot of work. You’ve got to mix the batter, chill the dough, roll them out, bake them, cool them, make a boat load of icing, figure out decorations, and then make them pretty. When I found this recipe I was ecstatic. All that is involved is dumping all of the ingredients into a food processor, mixing it all up, flattening it, and cutting it into shapes. It’s literally as easy as making and playing with Play-Doh, but that’s a recipe for another day. It took 10 minutes to make from start to finish (minus refrigeration time at the end).

The verdict? Rich, filling, and delicious. My kids ate 2 each and proclaimed that they were stuffed; stuffed full of the goodness of healthy fats, whole grains, and a little chocolate!

Another cool thing is that the OSG recipe has a method for making your own vegan chocolate chips and although I didn’t give them a try for this recipe, the method is mind-blowingly simple. If you try them, let me know how they worked out for you. I am keeping that recipe in my back pocket since there is only one store in The Middle of Nowhere, Saskatchewan that sells my chips and they are frequently out of them.

This recipe makes about 2 cups of dough (which made a 9 x12 sheet of those cute heart-shaped cookies).

I know a friend of mine is waiting for this post, so without prolonging the agony further, here it is:

Ingredients

1 3/4 cups pumpkin seeds

3/4 cup old fashioned rolled oats

1/4 cup of agave nectar (I am positive that you could use honey if true vegan-ness isn’t a concern)

2 tsp vanilla extract

1/4 cup coconut oil (this has a big influence on the flavor, but in all honesty, the recipe will likely still work if you use any fat that is solid at room temperature. Don’t choose something like  vegan margarine because it has too much water content, but vegetable shortening could be a good replacement. Please comment if you try this.)

1/2 cup Vegan chocolate chips (like PC The Decadent Semi Sweet Chocolate Chips)

Directions

Toss everything except for the chocolate chips in a food processor and grind up until the dough forms a large ball. It it seems dry, add a little extra agave. If it seems wet, toss in some extra oats. The fats and sweeteners you choose to use could cause slight variations in the amount of moisture in the recipe. When you get a kneadable ball, you’re golden.

Once the dough ball is formed, add the chocolate chips and pulse the processor a few times until they are combined. If you don’t want your chips broken up, you can always knead them in by hand.

Line a cookie sheet with parchment paper and set aside. You can either flatten the dough and cut out shapes with cookie cutters or form it into balls.* If you want you could squish the balls to make them look like regular cookies. Place shapes on cookie sheet and freeze 30 minutes. Serve chilled or frozen.

*If the dough melts in your hands, refrigerate it for 30 minutes prior to shaping it.


You could easily make this recipe gluten free by using gluten-free rolled oats. This recipe is also soy free!

No-Bake Chocolate Chip Cookie Power Balls (Vegan)

7 Feb

I’ve really been working hard at creating healthy variations of our favourite treats. A snack is that much better if the ingredients are less refined and if I can sneak a little protein in them to power us through to our next meal. I know that Angela Liddon (Oh She Glows blogger) is an awesome vegan baker with the same goals. She tends to use a lot of nuts for protein in her baking, but due to peanut and tree nut allergies in our household, I had to modify her surely delicious recipe for Chocolate Dipped Chocolate Chip Cookie Dough Balls. These bite-sized morsels are delicious. They have a buttery texture thanks to the pumpkin seeds and the combination of rolled oats, bran, and whole wheat flour give the dough a nutty texture. The sweetness comes from dried, pitted dates and pure maple syrup. There are no eggs, dairy products, or soy products in this recipe and refined sugar is seriously limited to the tiny quantities of chocolate chips. I can foresee us making more of these in the summer since we can enjoy chocolate chip cookies without heating up the house. I like that these snacks are nutritionally dense. They are loaded with protein and fiber and I can honestly say that I was satisfied with just one! Makes about 20 balls (1 tbsp in size).

Ingredients

2/3 cup cup pumpkin seeds

1/2 cup + 1 tbsp old fashioned rolled oats

1/4 cup whole wheat flour

1/4 cup bran

1 tsp sea salt

5 dried, pitted dates

1 tsp vanilla

1/4 cup maple syrup

1/4 cup vegan chocolate chips (I like PC The Decadent Semisweet Chocolate Chips from Superstore/Extra Foods/Loblaws)

Directions

In a food processor, pulse the pumpkin seeds until they are finely chopped. Add the oats, bran, flour and sea salt and process until the mixture resembles flour. Add the putted dates, vanilla, and maple syrup. Process until mixture forms a ball.

Remove the ball of dough from the processor and stir in the chocolate chips.

Take a tablespoon of dough in your hands and roll it into ball. Repeat and freeze dough balls on a parchment-lined cookie sheet. When frozen, place the dough balls in a re-sealable freezer bag and store in the freezer. Enjoy frozen and at room temperature!

Slow Cooker Thai Curry

7 Feb

There are two nights each week when we are particularly frenzied during supper time. You know what it’s like, I’m sure. You come rushing in the door from (*insert your activity or one of your your family member’s here), throw all of your jackets and activity-related accoutrements on the floor or nearest piece of furniture, dash for the kitchen, inhale your food, and scurry yourself (and your brood) out the door  to (*next activity). If you’re lucky, you have time to use the washroom before leaving. This Thai Curry in a Crock-Pot recipe that will save your bacon and your sanity because it is easy to prepare and is cooked in a Crock-Pot. You can prep/cook the bedding (rice, quinoa or shredded lettuce) the night before to make it even faster. It is good with shrimp, chicken thighs or meatless. I love being able to enjoy a dish in a variety of ways. This recipe also gives us our “creamy” fix since all of our dinners are dairy and egg free. It has a slightly exotic flair and is a nice recipe to have in your repertoire.

Ingredients

1 can full fat coconut milk

1 cup chicken broth/stock

1 can bamboo, drained

1 can baby corn pieces, drained

4 shredded carrots

1 diced red bell pepper

2 tbsp curry powder

2 tbsp oyster sauce

1/2 tsp hot chili sauce

2 tbsp corn starch + 1/4 cup water

1 handful chopped cilantro

40 raw shrimp (peeled, deveined, tails off)

Directions

Combine all of the ingredients except the corn starch, water, cilantro, and shrimp in a slow cooker and simmer on low for 3 hours.

Whisk together the corn starch and water and add to the pot. Simmer until thickened (about 5 minutes). Add shrimp and simmer for an additional 20 minutes. Stir in a handful of fresh cilantro.

Serve over rice, quinoa (I know it’s not Thai, but it’s GOOD), or iceberg lettuce. Did you know that all stir fry is delicious served on crunchy lettuce?! If you want to make it fancy, garnish with green onions sliced lengthwise into spears and toasted sesame seeds.

Chicken Variation:

Add as 6-8 boneless, skinless chicken thighs (whole or sliced, whichever you prefer) when you begin slow cooking.

Mommy’s version is shown above with the curry served over a bed of lettuce. The kids and my hubby like it best over a carb (quinoa shown below).


Vegan Vanilla Cupcakes

3 Feb

Sometimes great recipes happen on the go, and that is the case with this one, so please forgive the shot of this cupcake that came from my mobile phone. I needed some vegan cupcakes to take to a party the other day and made this favorite recipe. You can make it into a cake or cupcakes; simply adjust the baking time as needed. These cupcakes bake up light and fluffy and have a lovely vanilla flavour. I prefer to use real vanilla extract as opposed to artificial in all of my baking and in this recipe where vanilla is the “showcase” flavor, it is extra important. When vanilla is in the title of the recipe, it has to be real vanilla. This recipe contains no refined sugar and is very simple to make for cupcake beginners. Give it a try! Makes 16 cupcakes or one 9 “x 13” cake. For a good buttercream icing recipe and the frosting method shown in the photo, check out my post from earlier today.

Ingredients

1 1/3 cups sucanat (sugar cane natural sugar or yellow sugar)

1/2 cup vegan margarine, softened (try Becel Vegan, Earth Balance Buttery Spread, or Celeb Lactose Free)

3 cups cake and pastry flour

1 tbsp baking powder

3/4 tsp salt

2 cups soy milk, rice milk, almond milk, hemp milk, or the non-dairy milk of your choice

1 1/2 tbsp pure vanilla extract

Directions

  1. Preheat oven to 350 F. Line a muffin tin with cupcake liners and set aside. Using a stand mixer or a large bowl with a handheld mixer, mix the sucanat and margarine on medium speed until light and fluffy (about 3-4 minutes). Gently stir in the milk and vanilla.
  2. In a second bowl, sift or stir the dry ingredients together. Add them to the liquid ingredients in 2-3 batches, mixing well after each addition. Add the vanilla extract and mix an additional 2 minutes or until combined.
  3. Fill cupcake liners 3/4 full with batter OR pour batter into a greased 9″ x 13″ cake pan. For cupcakes, bake 20-25 minutes. Cake will take 30-35 minutes.
  4. Frost as desired. Try this Morsels Minus buttercream icing. You’ll find it near the bottom of the post. If you choose, dye it any colour you like!

Variation

Could you make the cupcakes with granulated and/or brown sugar instead of sucanat? I would think so, although I have not tried it. If you successfully substitute, please comment and let me know how it worked out for you!

Vegan Maple Nut Balls

22 Nov


By the end of November I am always hyper-aware that Christmas is coming. Some of you might gasp, but I have begun my Christmas baking. I’ve been trying to come up with vegan, nut free treats to replace store-bought boxed chocolates. When I was a kid, my mom used to make peanut butter balls. They were delicious. This is my take on what I recall of a favourite Christmas treat. They are vegan, unbaked, nut, free, and super tasty. I could hardly keep the kids (and me) out of the batter while I was shaping the balls. The combination of soy nut butter, maple syrup, chocolate, and nutty hemp hearts kept everyone going back for “just one more.” They are made with bran and wheat germ, giving them a healthy dose of fibre. I can’t wait to share these with my family at Christmas. I just hope they survive over the next month in the freezer; I’ll bet they would be delicious frozen! Yum, yum, yum! Makes 24 tablespoon sized balls.

Ingredients

1 cup nut butter (I used soy nut, but you could use peanut, cashew, almond, etc.)
1/2 cup maple syrup
1 cup oat bran
1/2 cup wheat germ
1/2 cup hemp hearts
1/2 cup vegan chocolate chips (try PC The Decadent Semi Sweet Chocolate Chips) or chopped dates
1/2 cup shredded coconut

Directions

In a food processor, blend together the nut butter and maple syrup. Add the oat bran, wheat germ, hemp hearts, and chopped dates and blend until it has a stiff, dough-like consistency. You can either roll the dough into 14 individual orbs and then roll them in coconut and chill, or spread the dough onto a square pan and sprinkle with coconut, chill, and cut into squares.

Vegan Skor Bars

19 Oct

Rarely is a recipe so amazing that I have to blog immediately following first bite, but here I am munching blissfully away while sharing a recipe with you. Halloween is on our doorstep and Christmas is just around the corner. These are definitely two of the biggest “chocolate” holidays of the year. The world is your chocolate covered oyster (figuratively speaking… I will not attempt to give an oyster the dip) if you eat dairy products and nuts. However, for people who are vegan or suffer from food allergies, chocolate treats are very hard to come by and are often greatly missed during the holidays.  Dairy and nut allergies affect both of my children, but no longer need they miss out. This recipe for Skor bars is a FANTASTIC (yes, it deserves CAPITALS). It is ridiculously easy to make, has bang on Skor flavour, and my kids went INSANE (also deserving CAPTITALS) over them. This would be a great first recipe for the aspiring baker. It is fool proof, takes only 10 minutes to prep, and appealing to everyone. No trick, all treat. Give them a try and if you have a sweet tooth, add an ounce of extra self control. Makes one 9″ x 9″ pan (serves 12). This recipe can be frozen if you have the discipline to save them for the holidays. Freeze flat in layers with parchment in between.


Ingredients:

Non-stick cooking spray (try Pam original)

12 saltine crackers (Premium Plus are vegan)

1/2 cup brown sugar

1/2 cup vegan margarine (like Becel Vegan, Earth Balance, or Celeb Lactose free)

1 tbsp corn syrup (or use sucanat for a healthier choice)

1/2 cup vegan chocolate chips (try PC The Decadent Semi Sweet Chocolate Chips from Superstore/Extra Foods/No Frills/Loblaws)


Directions:

  1. Preheat oven to 300 degrees Fahrenheit. Spray a 9 x 9 bar pan with non-stick cooking spray. Line with saltine crackers, splitting them as necessary to cover the bottom of the pan.
  2. Over medium heat, melt the margarine, brown sugar and corn syrup, whisking constantly. Once it begins to bubble, continue whisking for 2 minutes.
  3. Pour caramel mixture over saltines and bake for 10 minutes (no longer!).
  4. Spread chocolate chips evenly over caramel. Let stand 5 minutes before spreading carefully with a spatula.
  5. Allow to cool completely before slicing with a very sharp knife and serving.